You’ve had the dream of working in wood for a long time. Maybe you’ve got some tools. Imagine setting up a nice little workspace. A spare room in your house, or a garage, or maybe if you’re fortunate you’ve repurposed or built a separate structure outside your home. You’re dream space where you do fine woodworking, in piece.
If fine woodworking is what you’re interested in, you’re gonna need good hand tools. working with bad tools just sucks for anyone, beginner or advanced. I think that especially beginners need decent tools, because cheap ones are extra challenging to work with. it’s like getting a crappy guitar and expecting to enjoy the learning process.
But… where do you start? What tools should you buy? From whom? And how do you learn how to use them? You’ve probably poked around online or even watched a bunch of youtube videos, but there are so many approaches and so much information out there that it’s easy to get lost. What you need is methodical, laid out education. Luckily, that’s what I’m here for! In this article I’ve laid out what I think are the essential hand tools for good work – the way I do my own work and teach here at Finewoodschool.com. So you don’t need to amke all kinds of needless mistakes while getting deeper into this journey.
Of course, there are many paths one can take when approaching woodworking, and some of them are up to self discovery as you progress. This list has been curated over years of education and experience and is what works for me and for my students. So let’s get started!
First of all, I’d suggest starting with only what you absolutely need, and acquiring tools as you progress based on the kind of work you do, or what your teacher recommends. Sure, it’s exciting to indulge in the feeling of renewal, especially when it comes to tools; that’s okay – I encourage enthusiasm, its part of the fun! But, I’ve often seen people spend a lot of money on tools that don’t end up being useful, which is a shame (That being said, if you do buy tools that you eventually don’t need, you’re definitely able to sell what you’ve already bought; in this market most things tend to retain their value pretty well.)
There’s something special about building your tool arsenal slowly and steadily, matching the pace of your work. This way, you find yourself more connected to your tools and the craft, keeping only what you truly use, and knowing very well how it works. everything is in tune. There’s a certain purity to it. Your relationship with the tools becomes more personal, like friends you’ve acquired along the way, and your woodworking will be better for it. Add to that the fact that some tools can be made yourself (hand tools, chisels, carving knives, etc.—more on that later), and you get a different picture: personal, intimate, non-commodified items, much like the furniture we build.
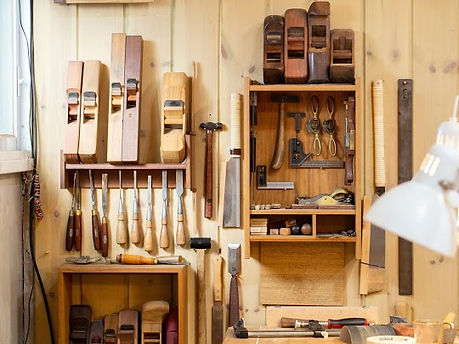
If you look at my bench in the shop with all my hand tools around it – I don’t have too many tools. I have what I need, and here and there I have something special for a specific purpose. I’m not a collector (it’s makes me sad to see tools gathering dust).
So: start learning, start doing. Maybe take a local workshop if there’s a good school close to you, or travel especially for it. There are plenty of online resources and videos, including my own YouTube channel, and with time and experience, you’ll figure out what you need. Or, if you’re serious and willing to invest in learning thoroughly from the comfort of your own workshop – join a Fine woodworking course with me here online.
Now, all that being said, I do have a list of tools that I can recommend because I’m quite sure that if you delve seriously into fine woodworking, you’ll need them.
Important note: I work with a hybrid of stationary machines and hand tools. The fact that I use machines in my work means I don’t need various speciality hand tools. For me, my machines are just as amazing as hand tools, and I’m equally connected to them, and wouldn’t give them up. The implication is that in exchange for my knowledge of machines, there are hand tools I’ve hardly touched, and I’m not an authority on whether they are good or how to use them. I understand those who choose not to use machines, especially if there’s just no space or budget for them. but I think that often the negative attitude towards them comes from poor experiences, a lack of understanding of the mechanics, and improper or unsafe work techniques.
But the hand tools that I use and know well – boy, do I love them! I feel confident in teaching their use and recommending specific tools that I see as fundamental. So, here we go!
(Disclosure: I’ve included some links to Amazon in this list. When you buy through these links, I earn a commission, which helps me keep this show running. thank you!)
Recomended hand tools:
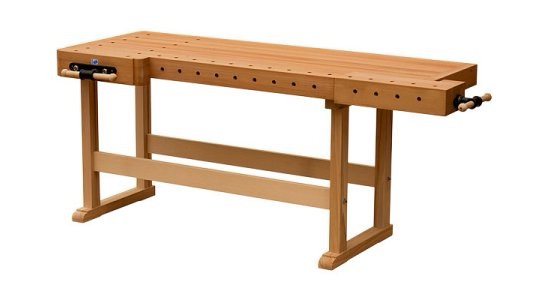
Workbench:
I often encounter the desire to build a workbench as a first project, and it’s clear that this is amazing both as an experience and for the technical options it opens up: size, sturdiness, clamping possibilities, etc. Almost all the benches throughout history can be replicated and built with detailed instructions, and manufacturers make the appropriate vises to go with them. Nevertheless, I believe you should buy a bench and start building furniture. It’s a bit complex and cumbersome as a first project (depending on the type of bench), and good hardware is expensive, plus shipping—not to mention the work time—so it’s even more economical to just order a decent bench. Beyond that, I think it takes time to understand how you like to work, what kind of vises you’re looking for, and so on. So if you’re going to build a bench, it should be after gaining experience and having a clearer understanding of your needs as a woodworker.
The most important starting point is a solid, flat, stable work surface with clamping options.
The most important thing in a workbench is, first and foremost, mass and stability, and the ability to hold your workpiece securely. I prefer benches in the German style over the Swedish style. The differences lie in the types of vises—I like what’s called a “tail vise\end vise” – the holding options are very versatile, whether for planing boards or for precise work on smaller parts like joinery or carving.
I personally use and very much enjoy this bench from German manufacturer “Hoaffman and Hammer”. I like the fact that it doesn’t have a “tool well”, witch allows for more workspace and less stuff cluttering in there. It has many clamping options. Also, it’s not too large. I made my own wooden bench dogs to go with it (send me an email if you’re interested in how I made them, I’ll be happy to share).
I do also have this large bench – a luxury for working on larger pieces.
A good option (and cheaper) is this workbench from Sjobergs, available on Amazon: https://amzn.to/3Tw45h1. It’s definitely not as robust, in terms of surface thickness and clamping hardware, but you can get along just fine with it. I even have one for my students and have screwed on some thick pieces under the working surface to add robustness and thickness for stability and easy clamping. I also screwed it to the wall so it’s extra stable.
You might find a second hand workbench in good condition, but they’re usually in very poor condition after years of abuse and almost never justify the price. Unless the bench came from a woodworker you trust and is in good condition, I wouldn’t take the risk of trying to flatten such a bench – it need to be done by hand and often you encounter nails that ruin your blade. Speaking from experience 😦
Sharpening Stones:
Working with a sharp tool is such a pleasure. and the oppisite – an unsharp blade is frustrating, and pottentially dangerous. Everything starts with sharpening. A sharpening station is a place that you become friends with. I recommend water stones (as opposed to oil stones, diamond stones, or adhesive sandpaper) in grits 1000 + 8000 (preferably separate stones). The advantage of water stones is that they provide a very fast result. The main disadvantage is that they wear down with use and require flattening from time to time with a dedicated flattening stone.
I’m a big fan of Norton. There’s simply nothing like the feel, speed, and results they deliver. They last a long time (I sharpen a lot, and my first set lasted about 7 years). I’ve tried various different combinations from medium/high-end companies and still haven’t found anything that compares to it in my opinion. Especially the 8000 stone—it’s a bit expensive, but so worth it.
Watch my video here demonstrating sharpening with these stones.
Links for purchase on Amazon:
Norton 1000 grit stone:
Norton 8000 grit stone:
Norton 1000\8000 combination stone:
My Sharpening Station with NORTON Water Stones
Diamond Stone for Flattening Sharpening Stones:
Without a flat stone, you won’t get a flat blade, so this tool is essential. There are various options for flattening stones, but in my experience, this diamond stone is amazing and lasts a very long time if used only for this purpose.
I recommend the ATOMA brand, 400 grit. I also have a 140 grit for speeding up the process, but it’s definitely not a must—I worked with just the 400 grit for years.
Atoma 400 grit diamond stone:
Atoma 140 grit diamond stone:
Bench Grinder:
The grinder sets the blade angles and removes most of the material, making it much easier to achieve results later with water stones. It’s an essential part of the process. With a few adjustments, you can comfortably use it at any angle you want. You’ll use a rough stone, usually 80 grit.
We’re talking here about a classic hand-cranked grinder. Their great as it’s much harder to “burn” the the tip of the blade, essentially requiring a careful and long A small diamond stone for truing the aluminum oxide wheel is also essential. It’s not very expensive and can be found in the same stores.
I enjoy working with the hand grinder, though it’s more challenging in terms of coordination. It’s a matter of practice, and the learning curve isn’t too steep. It pays off in the long run. Developing the skill of paying close attention to small movements and understanding their impact on the material is crucial, and it serves us well when building furniture.
At some point, I also got an electric grinder for repairing chisel or plane blades when a lot of material needs to be removed (a more common situation in a shared workshop like mine). It’s fitted with a diamond (CBN) wheel instead of a regular stone to avoid overheating the steel temper. Honestly, I love it so much that I now almost exclusively use it. The hand grinder is still around—some people prefer it, and occasionally I do too, for nostalgia and the quiet.
Chisels:
I would recommend a basic set of five sizes (something like 3mm, 6mm, 10mm, 15mm, and 20mm). There are companies like Dictum or Luban that import chisels to Israel, and they are perfectly fine.
I personally use chisels from Lie Nielsen, which are very expensive but excellent (available here from England). Other high-quality manufacturers include the Canadian brand Veritas, though I haven’t tried their chisels myself. I really like the feel and weight of the Lie Nielsen chisels.
Another good source for chisels is second-hand markets (especially abroad if you happen to be in a big city) or local tool sellers and collectors (look for them on Facebook), or eBay. You can find real gems from good old brands—after all, it’s just a piece of straight steel attached to a handle (unlike more complex tools with moving parts), so it’s a very common tool with a long history and easy to find. However, an old chisel, even from a good manufacturer, will likely require more prep work, especially flattening the back of the blade.
Some of my chisels were made by repurposing old files – again, personal woodworking. When done right, these chisels perform on par with specialty, high-end ones. They’re also tailored exactly to my preferences and needs.
A Few Selected Chisels: The first one on the right used to be a file that my grandfather brought with him from South Africa. The second from the right is a “Lie-Nielsen” chisel, and it has a few sisters. The rest are also self-made, designed for special tasks.
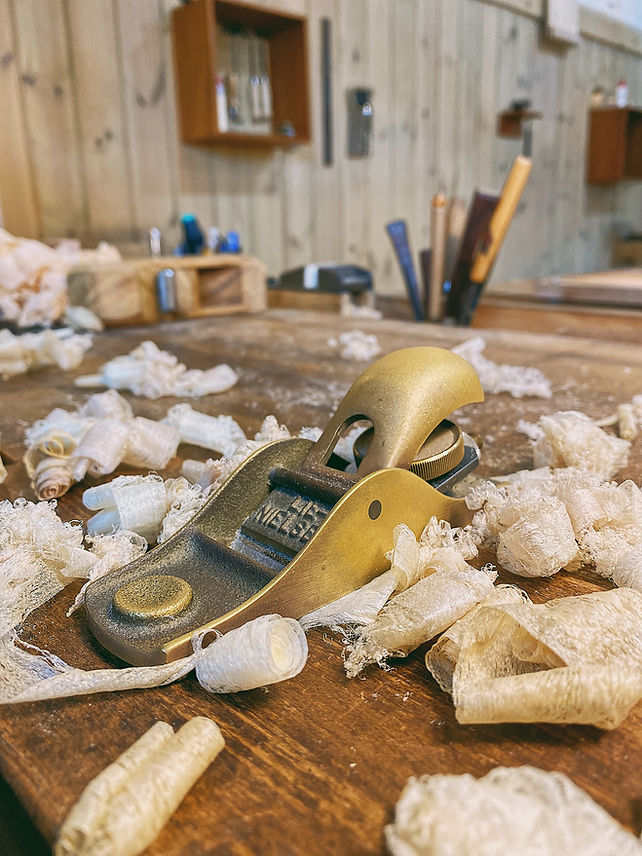
Block Plane No. 102:
As small as it is, it’s incredibly versatile. From leveling small surfaces and edges to comfortably softening corners and creating chamfers, this is probably the tool I use the most. The feel and weight are great, fitting comfortably in the hand. It can be used with one or both hands. I don’t recommend cheap replicas, but there are decent mid-range options like LUBAN.
You can find it locally on the Davutools website here or on Classic Hand Tools from England here, where I’ve made a few purchases in the past.
Important note: No blade comes ready to use, even from a very good manufacturer. It must be sharpened, and sharpened well. Every blade is made of two planes that meet, and we want to polish both. This is the first and crucial step in sharpening, and I’ve made a tutorial video on this. For ongoing sharpening of the blade angle, watch my video here.
Block Plane #60 ½:
Solid and heavier, it allows you to close the mouth of the sole very close to the blade while planing, which holds down the fibers and prevents tear-out, even when working against the grain (a feature that cannot be overstated). Additionally, the sides of the plane are at 90 degrees to the sole, which makes it suitable for use with a shooting board, unlike the more ergonomic #102, which is more comfortable for one-handed operations. I have the Lie Nielsen version. I believe the Dictum version is also excellent, and I have several for student use when the #102 can’t handle the grain.
You can find it here on the local Davtools website (which also carries cheaper alternatives I haven’t personally tested), or here on Classic Hand Tools from England.
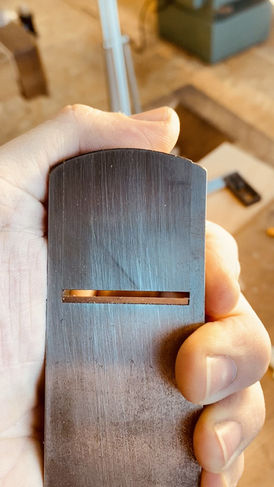
Blade Mouth Control
General Use Plane:
While I have great respect and affection for smaller planes, there is one essential tool in every woodworker’s kit: a general-purpose plane. It should be long and wide enough to smooth most of the surfaces you’ll work on, but not so long or wide that it becomes cumbersome. Typically, these planes have the blade bevel down, set at about a 45-degree angle, and often feature a chip breaker. The famous Stanley #4 is a classic example. In general, the wider the plane, the more it’s used for smoothing, while narrower and longer planes are for jointing.
Here, too, you can opt for a good mid-range plane or a top-quality modern classic from Lie Nielsen or Veritas.
Personally, I’ve learned to build and work with wooden planes in the Krenov style—mainly because of the comfort in working with them. It feels like wood in your hands, and the shape is carved to fit my hand and specific use. I use blades from Hock Tools in the U.S., which are imported to Israel (available here on the Davtools website). Long-term students who come to me often build their own wooden plane for general use. I have around ten wooden planes in different sizes, each with a unique character and story tied to the time I made it. It’s an intimate experience connected to your tools, and I wholeheartedly encourage it. Don’t mistake self-building for a compromise in quality; it might even be the opposite. Krenov called this plane the “violin in the orchestra,” setting the tone for the entire workshop.
I’m considering producing a detailed instructional video on building a Krenov-style plane, as it’s a subject close to my heart. But I’m not sure if there’s enough interest to justify the effort. If you’re reading this and are interested, please send me a WhatsApp message letting me know you’re into it. If enough people want it, I’ll go for it 🙂 Thanks!
In addition to my wooden planes, I have a Lie Nielsen #62 low-angle plane. It’s a great tool that also allows for closing the blade mouth to prevent tear-out.
Regarding other sizes or specialty planes, I’d wait and see what my actual needs are—what size furniture I’ll be building, what machines I’ll use (if any), etc.
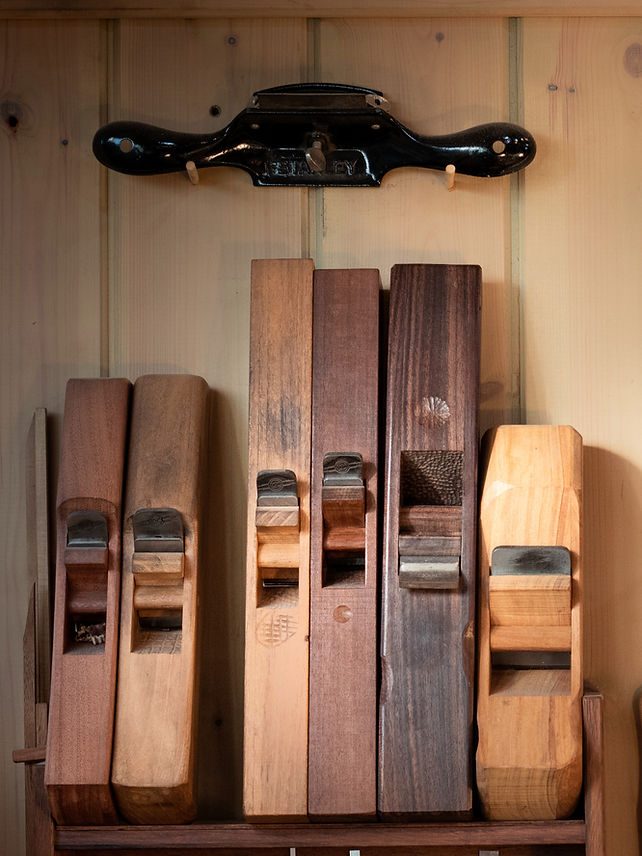
Some my self-made Krenov style hand planes
Hammer for Plane Adjustment:
There are various types, both Western and Japanese. It’s also common to make your own hammer. I’ve made quite a few with either iron or brass heads. Essentially, it’s a small hammer that’s convenient for tapping the blade to adjust the depth of cut or to align the sides for parallel cutting. Some hammers have one side that serves as a screwdriver for loosening the chip breaker on high-angle planes, which I find more convenient than separate screwdrivers. I use a fantastic hammer from Glenn Drake (unfortunately, it seems they’ve closed shop), but there are also cheaper options, though the screwdriver side may need some thinning to fit properly into the chip breaker screw slot.
Here’s a simple hammer of this sort on Amazon: linkhttps://amzn.to/3AHzFBU
Chisel Hammer:
In general, you need something with enough mass to provide good feedback when tapping on a chisel for joint making. I prefer Japanese steel hammers with concentrated weight in a relatively small head, compared to the Western mallet. I use a 375-gram hammer. Anywhere between 300 and 500 grams works well.
Here’s a 375-gram Japanese hammer (available in different weights): linkhttps://amzn.to/3T9FIFz
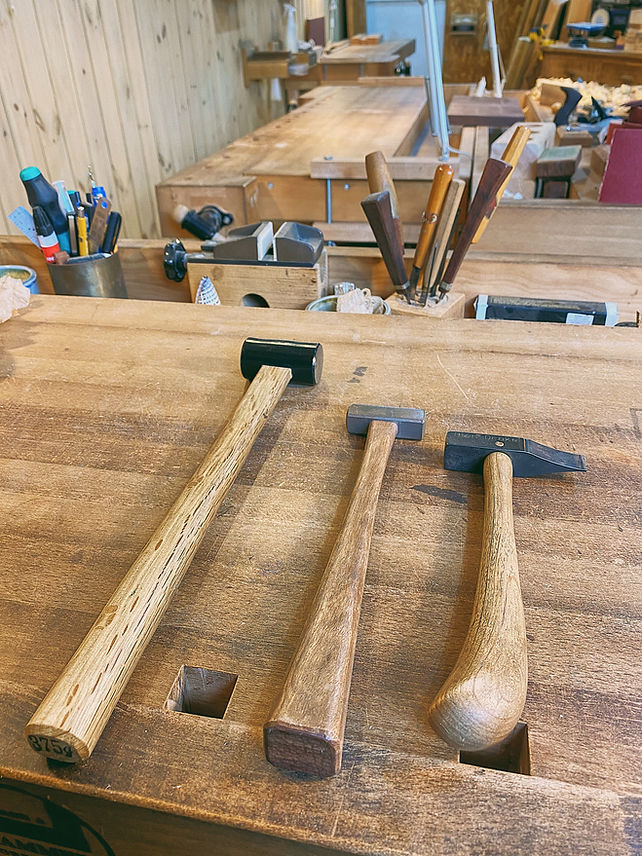
From right to left: Glen-Drake plane adjustment hammer, a custom-made adjustment hammer, and a 375-gram Japanese chisel hammer.
Squares:
A must-have tool, as I need to know if things are straight, flat, and at 90 degrees. An adjustable square opens up many possibilities for marking and measuring, and its removable ruler is very useful in various situations. I recommend the medium size (15 cm) from the high-quality Starrett company. The benefit compared to the cost is truly significant (there are cheaper options, but in my experience, they tend to be frustrating). The larger 30 cm version also serves me well—the long ruler is very helpful for checking surfaces, edges, plane soles, and other tasks.
If you want to treat yourself, the small Starrett square (also known as “Little Buddy”) is a fantastic tool, though the most expensive of the bunch. A simpler alternative is a small square from SHINWA, not adjustable but handy for checking edges and small surfaces.
Starrett 15 cm square:
https://amzn.to/3AHHlUO
10 cm straight square (a nice mid-size option to have):
https://amzn.to/3XlU9Ji
30 cm square:
https://amzn.to/3AEfTXP
SHINWA mini-square:
https://amzn.to/3X9IzQf
Straight Edge Ruler:
For checking the straightness of surfaces or edges, in larger sizes than the square rulers we use, which are essentially small straight edges themselves. The best (and priciest) are made of cast iron (I have a 60 cm Veritas one), but there are much cheaper aluminum options that do the job (I have a 1-meter one).
It helps a lot in spotting “high spots/low spots,” so you know where to focus your work with a hand plane.
Aluminum straight edge:
https://amzn.to/477JTaK
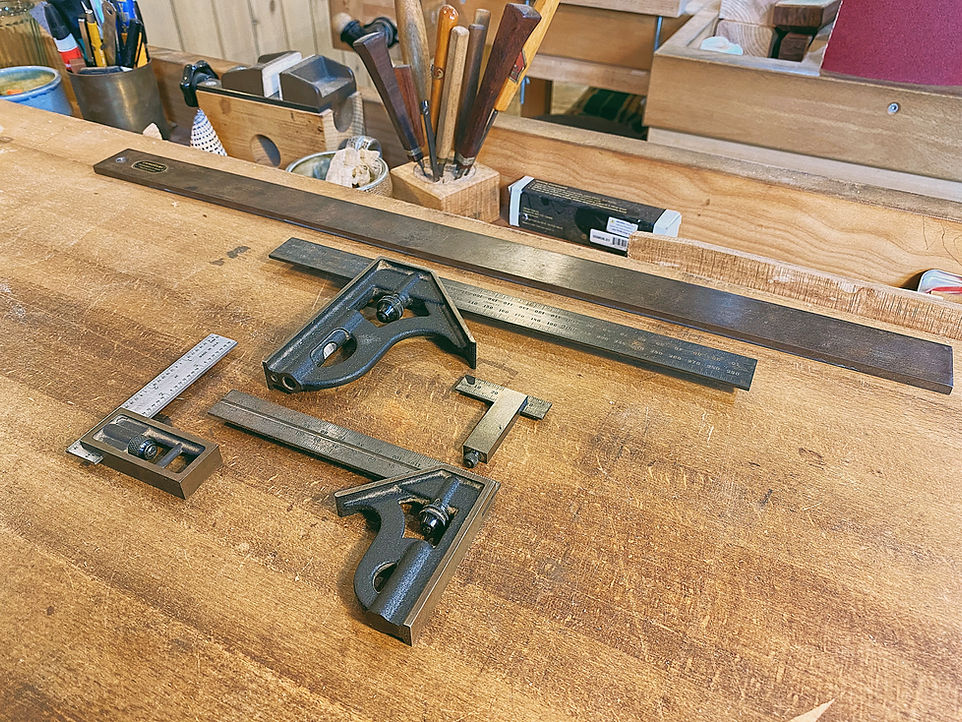
My collection of adjustable squares (almost all from Starrett). At the top is also a Veritas cast iron straight edge for checking the straightness of long surfaces.
Small, fine-tooth saw for joint cutting:
A Japanese Dozuki saw gets the job done. For creating joints, trimming parts, and general use. I love the lightness and thinness of Japanese saws—the hand is close to the material, and the cuts are clean. You can also add a larger Japanese saw without a stiff back for cutting large boards to shorter lengths. I personally use an “extra-fine douzouki” saw that I bought from Lee Valley in Canada (they also ship to Israel). A great saw, not very expensive, with the finest and cleanest cut I know (especially good for dovetail joints).
Another cute and very affordable option I recently added for students is a saw from ZONA. I used it during my time in Canada and remembered it fondly. It’s small, compact, fits well in hand, and works even for relatively large dovetails despite its size.
Simple Dozuki saw, 15 cm (an alternative to the one I mentioned):
https://amzn.to/3MkGAUh
ZONA saw:
https://amzn.to/3yWIiIo
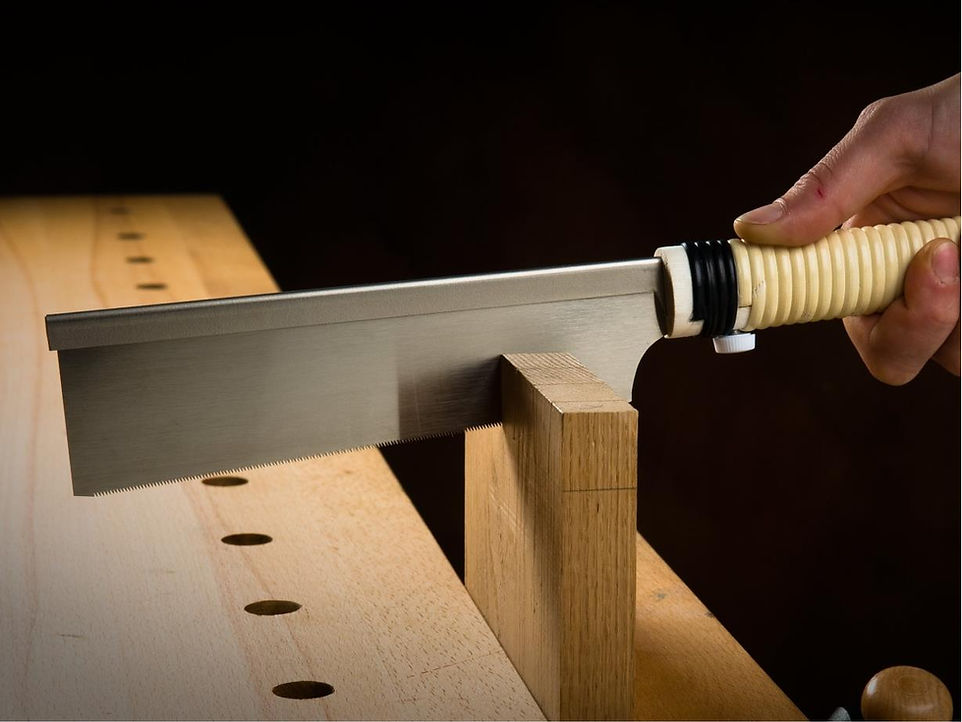
“Extra-fine douzouki” saw from Lee Valley.
Marking Gauge:
Great for marking precise locations for cutting joints, especially mortise and tenon—it creates a physical groove into which you can insert the chisel for the final pass. I also use it for marking out dadoes before routing to prevent fiber tear-out beyond the boundaries. Veritas makes a great marking gauge (here), and it’s relatively cheap, though the blade requires a good sharpening before use. I use the Tite-Mark from Glen Drake, an excellent tool, though unfortunately, it seems they no longer make them.
There are also very cheap alternatives that get the job done. I haven’t tried them, so I can’t recommend anything specific.

Marking gauges
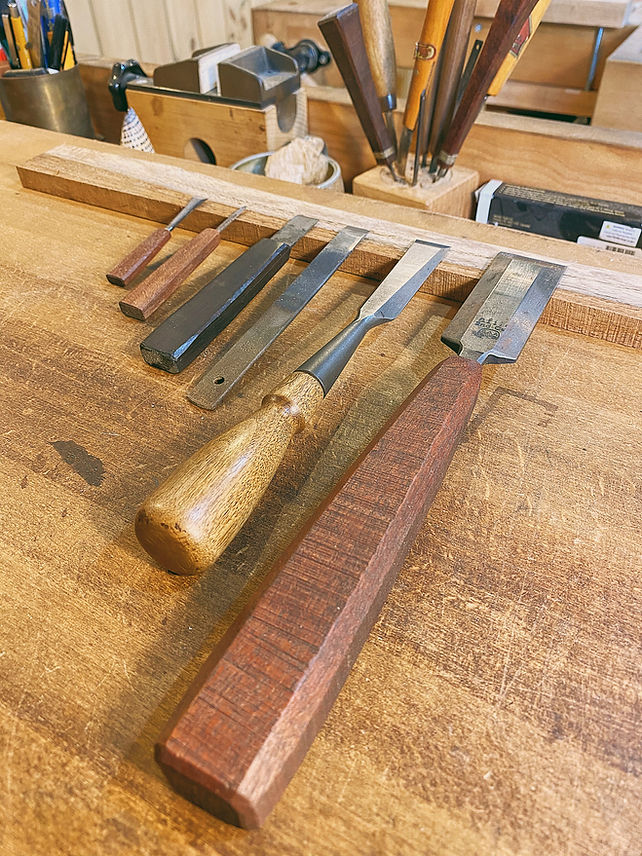
Files:
I love flat “Habilis” files. A small one and a larger one meet most of my needs. I also have a very fine finishing file for final work on the corners of hardwoods. It doesn’t hurt to have a coarse file and a round file or two around. Overall, this isn’t a super important tool in my style of work, though there are situations where it really helps.
“Habilis” file (an excellent brand, close to finish level but also removes material at a decent pace):
https://amzn.to/3AKABWc
A set of Habilis files in various shapes (useful in special situations, especially for carving):
https://amzn.to/4dUuAVc
Spokeshave
I debated whether to include this tool on the list because I’m not sure if it truly belongs in the basic list. But if you plan to work on something with curves at some point – this tool is essential. You can think of it as a very short-bodied plane with handles on the sides, allowing it to flow over curves (a regular plane doesn’t work well on curves, especially internal curves).
I have the simple and well-loved version from Lie-Nielsen, without adjustment screws. Just a few taps on the bench, and you’re in the right place. It’s a high-quality tool and super comfortable to use. It comes in a version with a flat sole for external and internal curves and a version with a rounded sole for tighter curves that the flat spokeshave can’t reach.
There’s also a good version from the German company DICTUM, with a different style – it has two adjustment screws that take some getting used to.
There are also premium versions from Veritas, though I haven’t used them much (occasionally with students who purchased them). And there are much cheaper options – I don’t recommend these unless you have a lot of experience because, in my experience, there are various preparation steps needed to get such spokeshaves to work properly, and as a beginner, it can be hard to notice or execute these steps correctly. Even then, it might not be comfortable to use. In short, buy something of quality if you want to enjoy using it.

Lie-Nielsen Spokeshave
Clamps
In a way, this should be at the top of the list because our work simply isn’t possible without the ability to hold things firmly and securely in place, both for regular woodworking and, of course, for gluing of all kinds.
Basically, I use two categories of clamps: pipe clamps or bar clamps for gluing panels or surfaces made from multiple boards, and classic clamps that fit most other situations. Of course, there are various subdivisions, and different brands emphasize different things – the main thing is that the clamp should do its job, stay in place, be comfortable to use, and last a long time – this is a tool that often works hard.
I’ll recommend a few types that I rely on for almost all of my work:
K BODY Clamps from BESSEY: Not an obvious first choice, but once you work with these clamps, they’re almost irreplaceable. They function both as a bar clamp and a regular clamp. They come in a professional and more expensive version that I use – unfortunately, they are no longer shipped to Israel from Amazon, and you have to buy them from other companies that do ship to Israel and pay more customs fees. Still worth it in my opinion, though not for every budget – it comes out to almost 400 shekels per unit. But there’s also a simpler version that I’ve heard does the job just fine, albeit a bit less robust – which isn’t necessarily a bad thing. They’re half the price and available with free shipping to Israel.
Find them here: Link
Classic Clamps (“F BODY”): You can find old clamps made in Israel by the now-defunct company “HaHot.” Unfortunately, the company no longer exists, but their clamps are excellent and still work great. I have several, and many times they save the day. From my experience, if you find such clamps, check the condition of the wooden handles, as that’s usually where they fail. It’s nothing unfixable, but it’s better to get a tool that works well from the start. BESSEY also offers good options here – not super heavy-duty, but still a very good tool that does the job at a good price. I have various sizes, and overall, I’m satisfied.
You can find them in different sizes on Amazon, and many are currently available with free shipping: Link
Pipe Clamps: These consist of a two-part set that you screw onto a metal pipe of any length you choose (preferably the version that fits a 3/4-inch pipe). Suitable for gluing panels, but also great for clamping board joints like dovetails or dowel joints. BESSEY also does an excellent job here: Link
DUBUQUE BAR CLAMPS: Perhaps my favorite clamps – they’re just so well-made, look good, and are comfortable to work with. However, they don’t ship to Israel, and there’s no importer. They’re mainly suited for gluing boards. You can find them in the U.S., where they’re made, or from Germany with expensive shipping to Israel. Personally, I brought 10 of them during a visit to Germany – I had to disassemble them to fit in my suitcase…
Mechanical Pencil with 2mm Lead, and a Suitable Sharpener:
Why does this make the list? Because the start of good work is precise marking. The thin and adjustable tip allows for accurate marking of joints. I use it all the time, and for dovetail joints, it’s irreplaceable in my opinion since you can extend the lead far enough to reach difficult-to-mark spots while copying the joints’ position. I use 2B lead – not too soft, not too hard.
I specifically recommend a pencil from STEADLER because their dedicated sharpener gives the best and most consistent results compared to simple sharpeners.
Besides that, I also like using a mechanical pencil with 0.9mm lead for markings that need to be less precise but more visible (like a line I’ll cut next to on the bandsaw), and a regular pencil with soft lead (5B or 6B) to scribble on the entire surface before planing – that way, I can track where I’ve “touched” and where I haven’t, whether it’s by hand planing or machine planing.
STEADLER MARS TECHNICO Pencil: Link
STEADLER Sharpener:
Link
2B Lead:
Link
Pentel 0.9mm Pencil:
Link
6B Pencils (12-Pack):
Link
Blue Painter’s Tape (“Blue tape”) from 3M:
Excellent for marking, protecting from finish, temporary gluing (its flexibility can act as a clamp), and generally fun to use. Plus, it has a pleasant smell. During my studies in Canada, we couldn’t live without this tape and the double-sided tape below. Beware of imitations of these two products.
A pack of 4 rolls (1-inch width) will last you a long time:
Link
Double-Sided White Tape:
From IPG, U.S.A. This one specifically because it’s strong, reliable, easy to cut, and removes without leaving marks. It’s great for temporarily securing parts, especially for machine operations.
1-inch width (the one I use most):
Link
3/4-inch width:
Link
2-inch width:
Link
Sticky Sandpaper (Roll):
I consider this product as much a tool as anything else – its thickness is very consistent, and once it’s stuck onto something, you can trust that you’ll get exactly that when sanding on it. Very useful for flattening the soles of hand planes, flattening blades when you first get them, and even in the woodworking itself, it helps with various operations. I work with three grits that serve me well (I recommend only from 3M – it’s a bit pricey but lasts a long time if used wisely and if you store the pieces in a dust-protected container after use):
180 grit:
Link
80 grit:
Link
500 grit:
Link
Bonus: Book
Okay, this isn’t exactly a tool, but I can’t imagine my work without the teachings of James Krenov. Maybe it is a kind of tool?… His first book is monumental, not in its length but in its meaning: he talks about the “why,” not the “how.” And when the “why” becomes clearer, the “how” also takes shape, improves, and becomes more focused.
You can find it here: https://amzn.to/3XiTjfh
That’s it for hand tools – if you think something essential and important is missing from the list, feel free to contact me to ask questions or request recommendations.

Leave a comment